致谢 本文章大量参考了B站up主子烁爱学习 的五分钟设计模式 系列视频与GitHub用户CyC2018 的开源博客。已获得转载许可。子烁爱学习的空间 CyC2018的设计模式目录
什么是设计模式? 设计模式是软件工程的基石,是现在合作开发工程化的理论基础。不同的设计模式是现实生活中不断重复发生的时间的核心解决方案。
通俗来讲,就是前人总结出来的类和对象的写法,通过这种写法,能够让你的代码可以复用,不至于相同的功能写N遍;拓展性也好,能够很方便地应对变化的需求。
所以实际上市面上教设计模式的书也可以改名成《代码这样写,产品经理再刁钻也不怕》。
1 创建型 1.1 单例模式(Singleton) 确保类中只有一个实例,并提供该实例的全局访问点。
1.1.1 懒汉式-线程不安全 1 2 3 4 5 6 7 8 9 10 11 12 13 14 15 16 public class Singleton private static Singleton uniqueInstance; private Singleton () } public static Singleton getUniqueInstance () if (uniqueInstance == null ) { uniqueInstance = new Singleton(); } return uniqueInstance; } }
1.1.2 饿汉式-线程安全 1 2 private static Singleton uniqueInstance = new Singleton();
1.1.3 懒汉式-线程安全 1 2 3 4 5 6 7 public static synchronized Singleton getUniqueInstance () if (uniqueInstance == null ) { uniqueInstance = new Singleton(); } return uniqueInstance; }
1.1.4 双重校验锁-线程安全 1 2 3 4 5 6 7 8 9 10 11 12 13 14 15 16 17 18 19 20 public class Singleton private volatile static Singleton uniqueInstance; private Singleton () } public static Singleton getUniqueInstance () if (uniqueInstance == null ) { synchronized (Singleton.class) { if (uniqueInstance == null ) { uniqueInstance = new Singleton(); } } } return uniqueInstance; } }
1.1.5 静态内部类(推荐) 1 2 3 4 5 6 7 8 9 10 11 12 13 14 15 public class Singleton private Singleton () } private static class SingletonHolder private static final Singleton INSTANCE = new Singleton(); } public static Singleton getUniqueInstance () return SingletonHolder.INSTANCE; } }
1.2 简单工厂(SimpleFactory) 创建一个对象时不向客户暴露内部细节,并提供一个创建对象的通用接口,也就是工厂。
怎么理解工厂? 将建造方法集成在一个类中,当要用到时就建立工厂(new SimpleFactory),然后通过工厂方法生产。
Product 1 2 3 4 5 6 7 public interface Product public class ConcreteProduct1 implements Product public class ConcreteProduct2 implements Product public class ConcreteProduct3 implements Product
SimpleFactory 1 2 3 4 5 6 7 8 9 10 11 public class SimpleFactory public Product createProduct (int type) if (type == 1 ) { return new ConcreteProduct1(); } else if (type == 2 ) { return new ConcreteProduct2(); } else if (type == 3 ) { return new ConcreteProduct3(); } } }
Client 1 2 3 4 5 6 7 public class Client public static void main (String[] args) SimpleFactory simpleFactory = new SimpleFactory(); Product product = simpleFactory.createProduct(1 ); } }
1.3 工厂模式(Factory) 定义一个创建对象的接口,此接口并不实例化类,由其子类来实例化,工厂方法将实例化操作推迟到了子类。
实现 1 2 3 4 5 6 7 8 9 10 11 12 13 14 15 16 17 18 19 public abstract class Factory abstract public Product factoryMethod () public void doSomething () Product product = factoryMethod(); } } public class ConcreteFactory1 extends Factory public Product factoryMethod () return new ConcreteProduct1(); } } public class ConcreteFactory2 extends Factory public Product factoryMethod () return new ConcreteProduct2(); } }
1.4 抽象工厂(AbstractFactory) 提供一个接口,用于创建相关的对象家族。
实现 说明:可以将AbstractProduct理解为某一类产品,例如衣服类中的商务套装,商务套装包括上衣和裤子,需要一起使用。所以会让ProductA1和A2基础ProductA(B同理)。而用另一种分类法,上衣可以划分一类,裤子可以划分一类,对于工厂来说,这种划分方法更加科学。所以某一具体的工厂会按照这样的方式生产。
1 2 3 4 5 6 7 8 9 10 11 12 13 14 15 16 17 18 19 20 21 22 23 24 25 26 27 28 29 30 31 32 33 34 35 36 37 38 39 40 41 42 43 44 45 public class AbstractProductA public class AbstractProductB public class ProductA1 extends AbstractProductA public class ProductA2 extends AbstractProductA public class ProductB1 extends AbstractProductB public class ProductB2 extends AbstractProductB public abstract class AbstractFactory abstract AbstractProductA createProductA () abstract AbstractProductB createProductB () } public class ConcreteFactory1 extends AbstractFactory AbstractProductA createProductA () { return new ProductA1(); } AbstractProductB createProductB () { return new ProductB1(); } } public class ConcreteFactory2 extends AbstractFactory AbstractProductA createProductA () { return new ProductA2(); } AbstractProductB createProductB () { return new ProductB2(); } } public class Client public static void main (String[] args) AbstractFactory abstractFactory = new ConcreteFactory1(); AbstractProductA productA = abstractFactory.createProductA(); AbstractProductB productB = abstractFactory.createProductB(); } }
1.5 生成器(Builder) 封装一个复杂对象的构造过程,允许一步一步构造这个复杂对象而不是通过构造函数一次性建成。例如对于一个房屋对象,可以先构造其窗户对象,再构造门,墙,地板等等。
实现 1 2 3 4 5 6 7 8 9 10 11 12 13 14 15 16 17 18 19 20 21 22 23 24 25 26 27 28 29 30 31 32 33 34 35 36 37 38 39 40 41 42 43 44 45 46 public class BuildPattern public static void main (String[] arts) House house = new House.Builder(); house.setWindow(new Window()); house.setDoor(new Door()); house.setWall(new Wall()); house.build(); } } class House private Window window; private Door door; private Wall wall; public House (Builder builder) this .window = builder.window; this .door = builder.door; this .wall = builder.wall; } static final class Builder private Window window; private Door door; private Wall wall; public Builder setWindow (Window window) this .window = window; return this ; } public Builder setDoor (Door door) this .door = door; return this ; } public Builder setWindow (Wall wall) this .wall = wall; return this ; } public House build () return new House(builder.this ); } } }
1.6 原型模式(Prototype) 通过在类的内部实现一个克隆的方法,使得这个类可以很方便地被外部类克隆拿到属性值。
实现 1 2 3 4 5 6 7 8 9 10 11 12 13 14 15 16 17 18 19 20 21 22 23 24 interface Prototype Object clone () ; } class Plane () implements Prototype private String name; private String type; public Plane () } public String getName () return name; } public String getType () return type; } public Object clone () return new Plane(this ); } }
2 行为型 2.1 责任链模式(ResponsibilityChain) 是一种处理请求的模式,它让多个处理器有机会处理该请求,知道某个处理成功为止。责任链模式把多个处理器串成链,然后让请求在链上传递。
优点是将请求和处理分离开,请求者和处理者都不需要知道处理的全貌。也可以提高系统的灵活性,新增一个处理器代价小,不需要修改源代码。
实现 1 2 3 4 5 6 7 8 abstract class Handler protected Handler nextHandler; public void setNextHandler (Handler nextHandler) this .nextHandler = nextHandler; } public abstract void process (int info) }
1 2 3 4 5 6 7 8 9 10 11 12 13 14 15 16 17 18 class Leader extends Handler @override public void process (int info) if (info > 0 && info < 20 ) System.out.println(“Leader处理!”); else nextHandler.process(info); } } class Boss extends Handler @override public void process (int info) System.out.println(“Boss处理!”); } }
1 2 3 4 5 6 7 8 9 10 public class Client public static void main (String[] args) Handler level1 = new Handler(); Handler level2 = new Handler(); level1.setNextHandler(level2); level1.process(10 ); level1.process(20 ); } }
2.2 命令模式(Command) 命令模式可以将请求转化成为一个包含与请求相关的所有信息的独立对象。该转换能让你根据不同的请求将方法参数化、延迟请求执行或将其放入队列中,且能实现可撤销操作。
实现 1 2 3 4 5 6 7 8 9 10 11 12 13 14 15 16 class SaveButton private Command command; public void bindCommand (Command command) this .command = command; } public void doPrint () if (command == null ) throw new RuntimeException(“设备初始化失败!”); command.execute(); } }
1 2 3 4 5 6 class PrintService public void print (String text) System.out.println(text); } }
1 2 3 interface Command public void execute () }
1 2 3 4 5 6 7 8 9 10 11 12 13 class PrintCommand implements Command private PrintService serviceProvider = new PrintService(); private TextBox text; public PrintCommand (TextBox text) this .text = text; } @Override public void execute () serviceProvider.print(box.getContext()); } }
1 2 3 4 5 6 7 8 9 10 11 12 13 14 15 16 public class Client public static void main (String[] args) SaveButton.saveButton = new SaveButton(); TextBox box = new TextBox(); PrintCommand printCommand = new PrintCommand(box); saveButton.bindCommand(printCommand); box.setContext(“ABCDEFG”); saveButton.doPrint(); box.setContext(“ABCDEFGHIJK”); saveButton.doPrint(); } }
2.3 观察者模式(Observer) 定义对象之间的一对多依赖,当一个对象状态改变时,它的所有依赖都会收到通知并且自动更新状态。
实现 天气数据布告板会在天气信息改变时更新其内容,布告板有多个,并且在将来会继续增加。
1 2 3 4 5 6 7 public interface Subject void registerObserver (Observer o) void removeObserver (Observer o) void notifyObserver () }
1 2 3 4 5 6 7 8 9 10 11 12 13 14 15 16 17 18 19 20 21 22 23 24 25 26 27 28 29 30 31 32 33 34 35 36 37 38 public class WeatherData implements Subject private List<Observer> observers; private float temperature; private float humidity; private float pressure; public WeatherData () observers = new ArrayList<>(); } public void setMeasurements (float temperature, float humidity, float pressure) this .temperature = temperature; this .humidity = humidity; this .pressure = pressure; notifyObserver(); } @Override public void registerObserver (Observer o) observers.add(o); } @Override public void removeObserver (Observer o) int i = observers.indexOf(o); if (i >= 0 ) { observers.remove(i); } } @Override public void notifyObserver () for (Observer o : observers) { o.update(temperature, humidity, pressure); } } }
1 2 3 4 public interface Observer void update (float temp, float humidity, float pressure) }
1 2 3 4 5 6 7 8 9 10 11 12 public class StatisticsDisplay implements Observer public StatisticsDisplay (Subject weatherData) weatherData.registerObserver(this ); } @Override public void update (float temp, float humidity, float pressure) System.out.println("StatisticsDisplay.update: " + temp + " " + humidity + " " + pressure); } }
1 2 3 4 5 6 7 8 9 10 11 12 public class CurrentConditionsDisplay implements Observer public CurrentConditionsDisplay (Subject weatherData) weatherData.registerObserver(this ); } @Override public void update (float temp, float humidity, float pressure) System.out.println("CurrentConditionsDisplay.update: " + temp + " " + humidity + " " + pressure); } }
1 2 3 4 5 6 7 8 9 10 11 public class WeatherStation public static void main (String[] args) WeatherData weatherData = new WeatherData(); CurrentConditionsDisplay currentConditionsDisplay = new CurrentConditionsDisplay(weatherData); StatisticsDisplay statisticsDisplay = new StatisticsDisplay(weatherData); weatherData.setMeasurements(0 , 0 , 0 ); weatherData.setMeasurements(1 , 1 , 1 ); } }
1 2 3 4 5 CurrentConditionsDisplay.update: 0.0 0.0 0.0 StatisticsDisplay.update: 0.0 0.0 0.0 CurrentConditionsDisplay.update: 1.0 1.0 1.0 StatisticsDisplay.update: 1.0 1.0 1.0
中介者模式通过设置一个中介者,能够减少对象之间混乱无序的依赖关系,该模式会限制对象之间的直接交互,迫使它们通过一个中介者对象进行合作(就像计算机网络中的星型拓扑结构)。
每个参与者Component 都会维护一个Mediator 中介者对象,通过该中介者来执行相关操作,而不是直接与其他参与者交互。
实现 以婚姻中介为例子,一个婚姻中介场所吸纳了很多会员,会员不需要与其他会员产生联系,婚姻中介会自动给其匹配。该例中婚姻中介即为中介者,而会员是参与者。
1 2 3 4 interface MarriageAgency void register (Person person) void pair (Person person) }
1 2 3 4 5 6 7 8 9 10 11 12 13 14 15 16 17 18 19 20 21 22 23 class Person int age; Sex sex; int requestAge; MarriageAgency agency; public Person (String name, int age, Sex sex, int requestAge, MarriageAgency agency) this .name = name; this .age = age; this .sex = sex; this .requestAge = requestAge; this .agency = agency; agency.register(person:this ); } public void findPartner () agency.pair(person:this ); } } enum Sex MALE, FEMALE; }
1 2 3 4 5 6 7 8 9 10 11 12 13 14 15 class MarriageAgencyImpl implements MarriageAgency List<Person> people = new ArrayList<>(); public void register (Person person) people.add(person); } public void pair (Person person) for (Person p : people) { if (p.age == person.requestAge && p.sex != person.sex) { System.out.println(“配对成功“); } } } }
2.5 迭代器(Iterator) 提供一种顺序访问聚合对象元素的方法,并且不暴露对象的内部表示。
实现 1 2 3 4 5 6 7 8 9 10 11 12 13 14 15 16 17 18 19 20 21 public interface Aggregate Iterator createIterator () ; } public class ConcreteAggregate implements Aggregate private Integer[] items; public ConcreteAggregate () items = new Integer[10 ]; for (int i = 0 ; i < items.length; i++) { items[i] = i; } } @Override public Iterator createIterator () return new ConcreteIterator<Integer>(items); } }
1 2 3 4 5 6 7 8 9 10 11 12 13 14 15 16 17 18 19 20 21 22 23 24 25 26 27 public interface Iterator <Item > Item next () ; boolean hasNext () } public class ConcreteIterator <Item > implements Iterator private Item[] items; private int position = 0 ; public ConcreteIterator (Item[] items) this .items = items; } @Override public Object next () return items[position++]; } @Override public boolean hasNext () return position < items.length; } }
1 2 3 4 5 6 7 8 9 10 11 public class Client public static void main (String[] args) Aggregate aggregate = new ConcreteAggregate(); Iterator<Integer> iterator = aggregate.createIterator(); while (iterator.hasNext()) { System.out.println(iterator.next()); } } }
2.6 备忘录模式(Memento) 备忘录模式允许在不暴露对象内部细节的情况下保存和恢复对象之前的状态。
实现 1 2 3 4 5 6 7 8 9 10 11 12 13 14 15 16 17 18 19 class Document private String content; public Backup save () return Backup(content); } public void resume (Backup backup) content = backup.content; } public void change (String content) this .content = content; } public void print () System.out.println(content); } }
1 2 3 4 5 6 7 8 9 10 11 interface Memento } class Backup implements Memento String content; public Backup (String content) this .content = content; } }
1 2 3 4 5 6 7 8 9 10 11 class History stack<Backup> backupStack = new Stack<>(); public void add (Backup backup) backupStack.add(backup); } public Backup getLastVersion () return backupStack.pop(); } }
2.7 状态模式(State) 允许一个对象在其内部状态改变时改变他的行为,对象看起来似乎修改了他的类。状态模式是一种对象行为型模式。
实现 以张三为例,他在电子厂上班。他有多种状态,当状态不同时,他的行为不同。
1 2 3 4 5 6 7 8 9 10 11 12 13 14 15 16 17 18 19 20 21 abstract class State abstract void doWork () } class Happy extends State void doWork () System.out.println(“积极主动”); } } class Angry extends State void doWork () System.out.println(“暴躁易怒”); } } class Sad extends State void doWork () System.out.println(“啥也不干”); } }
1 2 3 4 5 6 7 8 9 10 11 class Context private State state; public void changeState (State state) this .state = state; } public void doSomething () state.doWork(); } }
1 2 3 4 5 6 7 8 9 public class Client public void static main (string[] args) Context zhangsan = new Context(); zhangsan.changeState(new Happy()); zhangsan.doSomething(); zhangsan.changeState(new Sad()); zhangsan.doSomething(); } }
2.8 策略模式(Strategy) 定义一组算法,将每个算法都封装起来,并且使它们只见可以互换,策略模式让算法独立于使用它的客户变化而变化。
与状态模式的比较 如类图所示,状态模式和策略模式十分相似。不同点在于状态模式是通过状态转移来改变Context所组合的State对象,从而改变Context行为。而策略模式侧重点在于行为具体采用何种策略,并且可以灵活地更换不同的策略。
实现 1 2 3 4 5 6 7 8 9 10 11 12 13 14 15 16 public interface QuackBehavior void quack () } public class Quack implements QuackBehavior public void quack () System.out.println(“quack!”); } } public class Squeak implements QuackBehavior @Override public void quack () System.out.println("squeak!" ); } }
1 2 3 4 5 6 7 8 9 10 11 12 13 14 15 public class Duck private QuackBehavior quackBehavior; public void performQuack () if (quackBehavior != null ) { quackBehavior.quack(); } } public void setQuackBehavior (QuackBehavior quackBehavior) this .quackBehavior = quackBehavior; } }
1 2 3 4 5 6 7 8 9 10 11 public class Client public static void main (String[] args) Duck duck = new Duck(); duck.setQuackBehavior(new Squeak()); duck.performQuack(); duck.setQuackBehavior(new Quack()); duck.performQuack(); } }
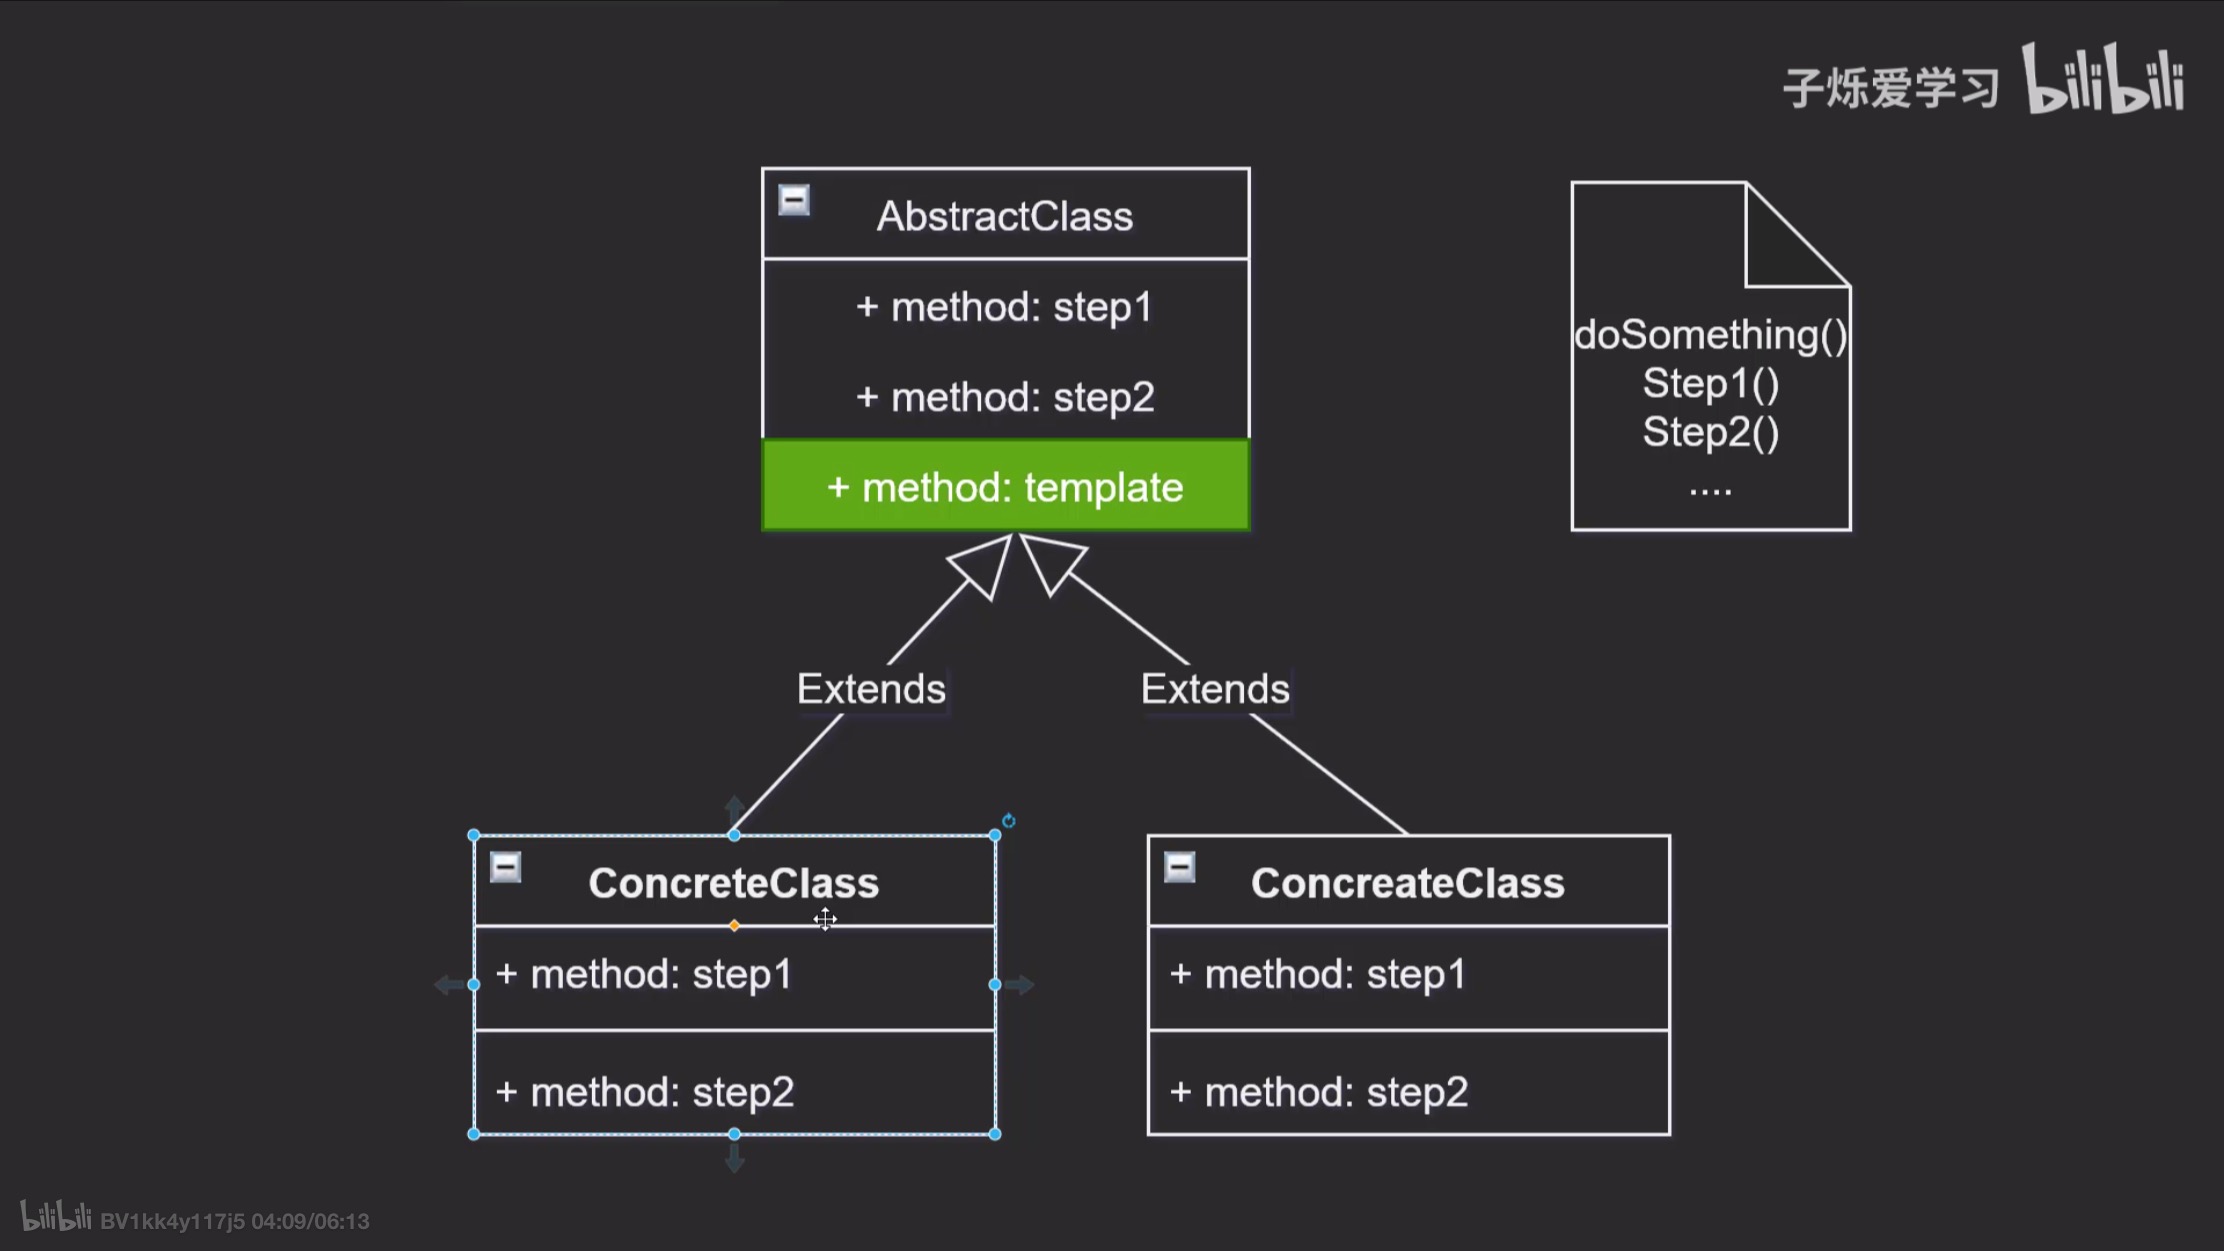
2.9 模版方法模式(TemplateMethod) 定义一个算法中操作的框架,而将一些步骤延迟到子类中。使得子类可以不改变这个算法的结构即可重定义该算法的某些特定步骤。
实现 以炒菜做饭为例子,Cooking中的Cook方法是算法的具体实现步骤,其中的某些步骤在父类中不做定义,而在具体子类再具体实现。
1 2 3 4 5 6 7 8 9 10 11 12 13 14 15 16 17 18 19 20 abstract class Cooking public abstract void step1 () public abstract void step2 () public void cook () System.out.println(“做饭开始”); step1(); step2(); System.out.println(“做饭结束”); } } class CookingFood extends Cooking public void step1 () System.out.println(“放鸡蛋和西红柿!”); } public void step2 () System.out.println(“多放盐少放味精”); } }
1 2 3 4 5 6 public class TemplateMethod public static void main (String[] args) Cooking cooking = new CookingFood(); cooking.cook(); } }
2.10 访问者模式(Visitor) 用于封装一些作用于某种数据结构中各元素的操作,它可以在不改变该数据结构的条件下定义作用于这些数据结构的新操作。
实现 1 2 3 4 5 6 7 8 9 interface Visitor void visitCPU (CPU cpu) } class UpdateVisitor implements Visitor public void visitCPU (CPU cpu) cpu.command += “:1 +1 =2 ”; } }
1 2 3 4 5 6 7 8 9 10 11 12 13 14 15 16 17 18 19 20 21 22 23 24 25 26 27 28 29 30 31 32 33 34 35 36 37 38 class EggRobot private CPU cpu; public EggRobot () this .cpu = new CPU(command:”记住1 +1 =1 ”); } public void calc () cpu.run(); } public void accept (Visitor vis) cpu.accept(vis); } } abstract class Hardware String command; public Hardware (String command) this .command = command; } public void run () System.out.println(command); } public abstract void accept (Visitor) } class CPU extends Hardware public CPU (String command) super (command); } public void accept (Visitor visitor) visitor.visitCPU(this ); } }
1 2 3 4 5 6 7 8 9 public class Client public static void main (String[] args) EggRobot erDan = new EggRobot(); erDan.calc(); Visitor updatePack = new UpdateVisitor(); erDan.accept(updatePack); erDan.calc(); } }
3 结构型 结构型模式是指将对象和类组装成一个更大的结构,同时保持结构的灵活和高效。
3.1 适配器模式(Adapter) 通过适配器将一个类的接口转换成另一个用户需要的接口。
实现 鸭子(Duck)和火鸡(Turkey)拥有不同的叫声,Duck 的叫声调用 quack 方法,而 Turkey 调用 gobble方法。
要求将 Turkey 的 gobble 方法适配成 Duck 的 quack 方法,从而让火鸡冒充鸭子!
1 2 3 4 5 6 7 8 9 10 11 12 13 14 15 16 17 18 19 20 21 22 23 24 25 26 27 28 29 30 31 32 33 34 35 36 37 public interface Duck () void quack () } public interface Turkey () void gobble () } public class WildTurkey implements Turkey @Override public void gobble () System.out.println(“gobble”); } } public class TurkeyAdapter implements Duck Turkey turkey; public TurkeyAdapter (Turkey turkey) this .turkey = turkey; } @Override public void quack () System.out.println(“gobble”); } } public class Client public static void main (String[] arts) Turkey turkey = new WildTurkey(); Duck duck = new TurkeyAdapter(turkey); duck.quack(); } }
3.2 装饰器模式(Decorator) 为对象(不是类)动态(非静态)的添加功能。
说明 所谓装饰,就是将带有新功能的装饰物套在某个对象身上,这样就不用修改其原来的类也能让其拥有新功能。与继承的区别在于: 适配器是对对象的功能拓展,并且适配器是动态的二继承是静态的。
实现 以饮料和配料为例。
设计不同种类的饮料,饮料可以添加配料,比如可以添加牛奶,并且支持动态添加新配料。每增加一种配料,该饮料的价格就会增加,要求计算一种饮料的价格。
下图表示在 DarkRoast 饮料上新增新添加 Mocha 配料,之后又添加了 Whip 配料。DarkRoast 被 Mocha 包裹,Mocha 又被 Whip 包裹。它们都继承自相同父类,都有 cost 方法,外层类的 cost 方法调用了内层类的 cost 方法。
1
2
3
4
5
6
7
8
9
10
11
12
13
14
15
16
17
18
19
20
21
22
23
24
25
26
27
28
29
30
31
32
33
34
35
36
37
38
39
40
41
42
43
44
45
public interface Beverage double cost () } public class DarkRoast implements Beverage @Override public double cost () return 1 ; } } public class HouseBlend implements Beverage @Override public double cost () return 1 ; } } public abstract class CondimentDecorator implements Beverage protected Beverage beverage; } public class Milk extends CondimentDecorator public Milk (Beverage beverage) this .beverage = beverage; } @Override public double cost () return 1 + beverage.cost(); } } public class Mocha extends CondimentDecorator public Mocha (Beverage beverage) this .beverage = beverage; } @Override public double cost () return 1 + beverage.cost(); } }
1 2 3 4 5 6 7 8 9 10 public class Client public static void main (String[] arts) Beverage beverage = new HouseBlend(); beverage = new Mocha(beverage); beverage = new Milk(beverage); System.out.println(beverage.cost()); } }
3.3 桥接模式(Bridge) 将抽象和实现分离开,使它们可以独立变化。
成果是将继承关系转变为关联关系,可以将一个复杂类的不同类型的功能解耦出来,便于独立添加新功能。
缺点是对于抽象思维能力要求比较高,需要熟知类的特点。
实现 RemoteControl 表示遥控器,指代 Abstraction。
TV 表示电视,指代 Implementor。
桥接模式将遥控器和电视分离开来,从而可以独立改变遥控器或者电视的实现。
1 2 3 4 5 6 7 8 9 10 11 12 13 14 15 16 17 18 19 20 21 22 23 24 25 26 27 28 29 30 31 32 33 34 35 36 37 38 39 40 41 42 43 44 45 46 47 48 49 50 51 52 53 54 55 56 57 58 59 60 61 62 63 64 65 66 67 68 69 70 71 72 73 74 75 76 77 78 79 80 81 82 83 84 85 86 87 88 89 90 91 92 93 94 95 96 97 98 99 100 101 102 103 104 105 106 107 108 109 110 111 112 113 114 115 116 public abstract class TV public abstract void on () public abstract void off () public abstract void tuneChannel () } public class Sony extends TV @Override public void on () System.out.println("Sony.on()" ); } @Override public void off () System.out.println("Sony.off()" ); } @Override public void tuneChannel () System.out.println("Sony.tuneChannel()" ); } } public class RCA extends TV @Override public void on () System.out.println("RCA.on()" ); } @Override public void off () System.out.println("RCA.off()" ); } @Override public void tuneChannel () System.out.println("RCA.tuneChannel()" ); } } public abstract class RemoteControl protected TV tv; public RemoteControl (TV tv) this .tv = tv; } public abstract void on () public abstract void off () public abstract void tuneChannel () } public class ConcreteRemoteControl1 extends RemoteControl public ConcreteRemoteControl1 (TV tv) super (tv); } @Override public void on () System.out.println("ConcreteRemoteControl1.on()" ); tv.on(); } @Override public void off () System.out.println("ConcreteRemoteControl1.off()" ); tv.off(); } @Override public void tuneChannel () System.out.println("ConcreteRemoteControl1.tuneChannel()" ); tv.tuneChannel(); } } public class ConcreteRemoteControl2 extends RemoteControl public ConcreteRemoteControl2 (TV tv) super (tv); } @Override public void on () System.out.println("ConcreteRemoteControl2.on()" ); tv.on(); } @Override public void off () System.out.println("ConcreteRemoteControl2.off()" ); tv.off(); } @Override public void tuneChannel () System.out.println("ConcreteRemoteControl2.tuneChannel()" ); tv.tuneChannel(); } } public class Client public static void main (String[] args) RemoteControl remoteControl1 = new ConcreteRemoteControl1(new RCA()); remoteControl1.on(); remoteControl1.off(); remoteControl1.tuneChannel(); RemoteControl remoteControl2 = new ConcreteRemoteControl2(new Sony()); remoteControl2.on(); remoteControl2.off(); remoteControl2.tuneChannel(); } }
3.4 组合模式(Composite) 将对象组合成树形结构来表示“整体/部分”层次关系,允许用户以相同的方式处理单独对象和组合关系。
组件(Component)类是组合类(Composite)和叶子类(Leaf)的父类,可以把组合类看成是树的中间节点。
组合对象拥有一个或者多个组件对象,因此组合对象的操作可以委托给组件对象去处理,而组件对象可以是另一个组合对象或者叶子对象。
实现 1 2 3 4 5 6 7 8 9 10 11 12 13 14 15 16 17 public abstract class Component protected String name; public Component (String name) this .name = name; } public void print () print(0 ); } abstract void print (int level) abstract public void add (Component component) abstract public void remove (Component component) }
1 2 3 4 5 6 7 8 9 10 11 12 13 14 15 16 17 18 19 20 21 22 23 24 25 26 27 28 29 30 public class Composite extends Component private List<Component> child; public Composite (String name) super (name); child = new ArrayList<>(); } @Override void print (int level) for (int i = 0 ; i < level; i++) { System.out.print("--" ); } System.out.println("Composite:" + name); for (Component component : child) { component.print(level + 1 ); } } @Override public void add (Component component) child.add(component); } @Override public void remove (Component component) child.remove(component); } }
1 2 3 4 5 6 7 8 9 10 11 12 13 14 15 16 17 18 19 20 21 22 23 public class Leaf extends Component public Leaf (String name) super (name); } @Override void print (int level) for (int i = 0 ; i < level; i++) { System.out.print("--" ); } System.out.println("left:" + name); } @Override public void add (Component component) throw new UnsupportedOperationException(); } @Override public void remove (Component component) throw new UnsupportedOperationException(); } }
1 2 3 4 5 6 7 8 9 10 11 12 13 14 15 16 17 18 public class Client public static void main (String[] args) Composite root = new Composite("root" ); Component node1 = new Leaf("1" ); Component node2 = new Composite("2" ); Component node3 = new Leaf("3" ); root.add(node1); root.add(node2); root.add(node3); Component node21 = new Leaf("21" ); Component node22 = new Composite("22" ); node2.add(node21); node2.add(node22); Component node221 = new Leaf("221" ); node22.add(node221); root.print(); } }
1 2 3 4 5 6 7 Composite:root --left:1 --Composite:2 ----left:21 ----Composite:22 ------left:221 --left:3
3.5 外观模式(Facade) 提供一个统一的接口,用于访问子系统中的一群接口,提供便利。
缺点是违反了开闭原则,如果添加了新的子系统,需要修改Facade类的代码。
实现 以看电影为例子,看电影需要启动很多电器,在外观模式中提供一个方法统一启动这些电器。
1 2 3 4 5 6 7 8 9 10 11 12 13 public class SubSystem public void turnOnTV () System.out.println(“turnOnTV()”); } public void setCD (String cd) System.out.println("setCD( " + cd + " )" ); } public void startWatching () System.out.println("startWatching()" ); } }
1 2 3 4 5 6 7 8 9 public class Facade private SubSystem subSys = new SubSystem(); public void watchMovie () subSys.turnOnTV(); subSys.setCD(“巡礼之年”); subSys.startWatching(); } }
1 2 3 4 5 6 public class Client public static void main (String[] args) Facade facade = new Facade(); facade.watchMovie(); } }
3.6 享元模式(Flyweight) 利用共享的方式来支持大量的细粒度对象,这些对象一部分内部状态是相同的。
实现 1 2 3 public interface Flyweight void doOperation (String exState) }
1 2 3 4 5 6 7 8 9 10 11 12 13 14 15 public class ConcreteFlyweight implements Flyweight private String intrinsicState; public ConcreteFlyweight (String intrinsicState) this .intrinsicState = intrinsicState; } @Override public void doOperation (String extrinsicState) System.out.println("Object address: " + System.identityHashCode(this )); System.out.println("IntrinsicState: " + intrinsicState); System.out.println("ExtrinsicState: " + extrinsicState); } }
1 2 3 4 5 6 7 8 9 10 11 12 public class FlyweightFactory private HashMap<String, Flyweight> flyweights = new HashMap<>(); Flyweight getFlyweight (String inState) { if (!flyweights.containsKey(inState) { Flyweight fw = new ConcreteFlyweight(inState); flyweights.put(inState, fw); } return flyweights.get(inState); } }
1 2 3 4 5 6 7 8 9 10 public class Client public static void main (String[] args) FlyweightFactory factory = new FlyweightFactory(); Flyweight flyweight1 = factory.getFlyweight("aa" ); Flyweight flyweight2 = factory.getFlyweight("aa" ); flyweight1.doOperation("x" ); flyweight2.doOperation("y" ); } }
1 2 3 4 5 6 Object address: 1163157884 IntrinsicState: aa ExtrinsicState: x Object address: 1163157884 IntrinsicState: aa ExtrinsicState: y
3.7 代理模式(Proxy) 代理模式为其他对象提供一种代理来控制对这个对象的访问。
共有4种代理模式:远程代理,虚拟代理,保护代理和智能代理。
虚拟代理(Virtual Proxy):根据需要创建开销很大的对象,它可以缓存实体的附加信息,以便延迟对它的访问,例如在网站加载一个很大图片时,不能马上完成,可以用虚拟代理缓存图片的大小信息,然后生成一张临时图片代替原始图片。
实现 以下是一个虚拟代理的实现,模拟了图片延迟家在的情况下使用与图片大小相等的临时内容去替换原始图片,直到图片加载完成才将图片显示出来。
1 2 3 public interface Image void showImage () }
1 2 3 4 5 6 7 8 9 10 11 12 13 14 15 16 17 18 19 20 21 22 23 24 25 26 27 28 29 30 31 32 33 public class HighResolutionImage implements Image private URL imageURL; private long startTime; private int height; private int width; public int getHeight () return height; } public int getWidth () return width; } public HighResolutionImage (URL imageURL) this .imageURL = imageURL; this .startTime = System.currentTimeMillis(); this .width = 600 ; this .height = 600 ; } public boolean isLoad () long endTime = System.currentTimeMillis(); return endTime - startTime > 3000 ; } @Override public void showImage () System.out.println("Real Image: " + imageURL); } }
1 2 3 4 5 6 7 8 9 10 11 12 13 14 15 16 17 18 19 20 21 public class ImageProxy implements Image private HighResolutionImage highResolutionImage; public ImageProxy (HighResolutionImage highResolutionImage) this .highResolutionImage = highResolutionImage; } @Override public void showImage () while (!highResolutionImage.isLoad()) { try { System.out.println("Temp Image: " + highResolutionImage.getWidth() + " " + highResolutionImage.getHeight()); Thread.sleep(100 ); } catch (InterruptedException e) { e.printStackTrace(); } } highResolutionImage.showImage(); } }
1 2 3 4 5 6 7 8 9 10 11 public class ImageViewer public static void main (String[] args) throws Exception String image = "http://image.jpg" ; URL url = new URL(image); HighResolutionImage highResolutionImage = new HighResolutionImage(url); ImageProxy imageProxy = new ImageProxy(highResolutionImage); imageProxy.showImage(); } }